Wednesday, December 12, 2012

Post #15: Circular Sock Knitting Methods

The first pair of socks I ever knit was back in 2005 when I was a very new and inexperienced knitter. At the time, I was living out in the country and the nearest knitting stores were at least an hour's drive away, so I relied heavily on a book to help me.That book is called "Socks Soar on Two Circular Needles" by Cat Bordhi and I have been a fan of hers ever since. She is well-known for her design of sock architecture and also for creating true knit moebius, (I guess plural would be moebii)? You can find her at www.catbordhi.com. In a future post I'll show some of the moebius bowls I knitted from another one of her books.
     Here are pictures of that first pair of socks while in process that I knitted a long time ago. I did actually finish both socks and they came out quite nicely, but I used a heavier yarn and would prefer something lighter. Dear hubby took them, even though they're a little short for him, (well, not anymore, because they are stretched out to his size now), but at least they're being used and loved.
 
     The method taught in the book, which I believe Cat Bordhi pioneered, was knitting one sock at a time in the round on two circular needles, instead of using double pointed needles. It was definitely a challenging project for a beginner. Since that time someone else came up with the magic loop method, which uses one longer circular needle instead of two. If you are a knitter I recommend you try all three methods and decide for yourself which you prefer. I actually like all three. Sometimes I find that double points are easy, but I don't like having to keep track of the extra needle, which I sometimes drop, and the way the stitches can sometimes fall off if you're not careful handling it while putting it in and out of your knitting bag. Two circulars was my preferred method for a long time, because that is what I was first introduced to, but sometimes it seems a bit too fiddly, having to keep rotating the needle around as you complete each half round. I find the same thing with magic loop, but it seems a little less fiddly as there are only two needle ends to deal with. 


     I had lots of fun knitting them. I never did knit another pair of socks until this fall, when I signed up for a sock knit-a-long on Ravelry, but I'll save that for another day.

Finding peace in creativity,

Meryl

Wednesday, December 5, 2012

Post #14: What has the DMV got to do with crafting?

     Now I ask you, what has the DMV (Department of Motor Vehicles) got to do with crafting? Maybe for you, nothing. But in my world, that's not the case! I got the renewal form for our auto tags in plenty of time for me to renew online. I guess I got so involved in my "projects" that for one reason or another I never got around to renewing. By the time I noticed it, the only way to not have expired auto tags was for me to go down to the dreaded motor vehicle bureau in person. Only for me, it is not something to dread, as I am always prepared. I never, ever, go anywhere without something in my purse to keep me occupied, whether it is a book to read in the Kindle app on my phone or a craft project I can work on while I am waiting, I am never bored or impatient. (Well, almost never...I'm certainly not perfect)!
     On this particular day I grabbed a book I had gotten from the library, Nicky Epstein's “Crocheted Flowers,” I made sure to have some small balls of cotton yarn and a crochet hook in my purse, and off I went to the DMV. When I got there at 11A.M. it was quite crowded; there was even a line to get a number. Mine was C305. When I sat down I looked up at the board and saw they were up to C272. Instead of being dismayed by this, I thought, “Oh, good, it’s time to crochet and relax.” Yes, I know I'm weird. Just ask any of my friends, they'll agree!
     
This is how I occupied my time (almost 2 hours) at the DMV. 
    Later I switched to another type of small flower I found in the book. I ended up making five or six of them in various colors, and then I made some more the next day. This morning I thought they might look nice on a collar for Alice, so I took some more discarded denim along with collar hardware from another old worn-out collar of Fido's, and this is what I came up with:

I added a fringe flower center made from the leftover yarn scraps.
This is one happy dog!

Alice loves to pose for the camera.
 

Please be patient with my photography skills. I'm using my
iPhone and really need to work on taking better pictures.
 
 Until next time...
 
Finding peace in creativity,
 
Meryl


Sunday, December 2, 2012

Post #13: Knitted Dodecahedron Ball

     I've mentioned the website Ravelry in a previous post. Fairly soon after I learned to knit I saw a pattern on there called "Celestine" which is a knitted dodecahedron (10-sided object) that was done all in white. It would have made a fantastic Christmas ornament. It looked so complicated to me I thought I would never in a million years be able to make something like that, but I saved the pattern to my favorites on Ravelry anyway. I think it was the very first pattern I ever saved there, it was so long ago.
     A lot of time has passed, and an awful lot of yarn has made its way into my shopping cart, my knitting bag, and wound itself around my needles since then. Earlier this summer I came across the same pattern on Ravelry, but this one was done using a self-striping sock yarn, and was called "Celestine Sox" (Sox is the name of the Berroco Brand yarn that was used in the sample). I thought, "I've always wanted to make that, maybe now I should give it a try."
     I have no idea which brand of sock yarn I used to make the one you see below. I know I purchased it in Tennessee about 7 or 8 years ago and when I decided to finally make this project, this ball of yarn was sitting in my night table drawer. We have moved a lot since returning to Florida and each time that silly ball of sock yarn stayed by my side, never geting lost in the shuffle of moving and rearranging, maybe for just this purpose.


     I had lots of fun working on this project. The first section and beginning the second section was the hardest, but a dear friend helped me out when I got stuck. Once I got it figured out I realized that it was actually quite simple. It's one of those things that looks much harder than it actually is.
     It is about 5-1/2" across, and if I had thought of it sooner I might have added a squeaky or some bells inside, so it could be a pet toy. There I go again, thinking up more projects; imagine that!
 
Finding peace in creativity,
 
Meryl


Thursday, November 29, 2012

Post #12: Tiny Companion Quilt

 
The e-mail address shown on the quilt is no longer valid.
 

     In Post #5 I presented a Trapunto quilt of a motor home that I created to hang in dear hubby's office at his job. At about the same time I also made a very simple line drawing of him, which I scanned into my computer, and then printed on a transfer sheet. I then ironed this onto cotton fabric and proceeded to quilt and bind it as a miniature quilt. It is only about 2-1/2" wide. On the quilt I included a phrase that he says to his customers all of the time and at the bottom is his old e-mail address.
     I'm sure you may notice that I do not always pay attention to how square and perfect my corners are. I'm usually more focused on the enjoyment of the process and that's just fine with me!
     The 2 little quilts are still hanging in his office today.

This is the line drawing, done the year we got married.
He no longer has the mustache nor the round glasses.

This is the coordinating quilt from Post #5.

Finding peace in creativity,
 
Meryl


Post #11: Dog collars & fabric & beads, oh, my!

     My dear hubby had been complaining lately. He's not really a whiner, but there was this one thing that had been bothering him for a while, and he simply couldn't let it go...so I finally took action, and now dear hubby is happy again. You see, our little dog has a spiked collar. She is a miniature pinscher and the pink leather with the stainless steel spikes looked so cute on her. But being a small and cuddly dog, she sleeps with us, and sometimes, those spikes hurt!
     I went into my closet and got out my “dog box” where I keep all sorts of things and mementos related to, well, my dogs: Fido, Queen of the Pillows, who was with me for almost 17 years, and now Alice, who has been a part of our family since May of this year.
     I didn't mean for this blog to be about dogs; I really intended to stay on subject and focus only on crafting and fiber arts, but anyone who knows me will attest to the fact that I am completely obsessed with my little dogs, past and present. But this is related to crafting, really! I promise. Anyway, in the dog box I found an old cotton collar that was Fido's. The fabric was faded and torn and I had kept it only for sentimental reasons and because I'm a crafter who figures “maybe I'll use it someday.” Well, this time I did.  
Fido, Queen of the Pillows, 2 yrs. old

Fido, around 13 yrs. old
Fido's old worn-out collar

     I proceeded to cut all of the pink fabric away, completely dismantling the collar, leaving only the plastic hardware to be reused in the making of a new collar for Alice. I had just shortened a pair of Lucky Brand jeans for dear hubby and the strips of denim I had cut away were just laying on the table waiting to be used. I do not care for nylon or other synthetic material for dog collars; they used to rub Fido's fur off around her neck, and I discovered that natural materials of either cotton or leather did not cause this problem. 
     After I cut, folded, and stitched the fabric on the sewing machine and held it up against Alice's dark fur, it just didn't show up, dark denim against black, so I decided to trim it with some lime green quilting cotton. On one side I hand stitched a gathered piece to add some texture. Then I got out some glass beads and hand stitched them on securely. 
     Dogs are funny when they you put a new collar on them. They're probably just reacting to your excitement and taking their cues from you, but Alice sure acted like she thought she was something special when I put that new collar on her. And you know what? She sure is!


Finding peace in creativity,

Meryl

Wednesday, November 28, 2012

Post #10: Dogs & Flannel Ragg Quilts

 
     This is the very first Ragg Quilt I ever made. Many years ago I took a mystery quilt class taught by Anthony Jones at the Bernina Sewing Center in Tampa and it was fun and easy to do. Anyone, even people who have no sewing experience can successfully complete a Ragg Quilt. Mystery classes are fun because you are told what supplies to bring to class, but do not know what project you are making until the project reveals itself as you complete it.

     When I took this picture recently, Alice, our miniature pinscher, had taken it over (or should I say under)? Yes, she is under there somewhere. Only three of us live in this house: Alice, dear hubby, and me, and at any given time there are at least three flannel Ragg Quilts on the sofa; yet, for some reason, dear hubby and I cannot always get a hold of them for ourselves. I leave it up to you to figure out why. 

 
     While we were living in Tennessee I made a Ragg Quilt for our friends up there. Now most of the time these quilts have all of the fringe on one side of the quilt, which leaves the back of the quilt smooth, but that makes it difficult to cut the fringe, as you are hand cutting through four layers of flannel all at once. I had seen an epispode of a TV show on PBS, I think it was "Sewing with Nancy", where the pieces were put together overlapping in a different way, and the effect was to have half of the fringe on the front of the quilt and half of it on the back. This made it much easier to cut the fringe, having to cut through only two layers at a time, but I did have to cut through the entire quilt twice, front and back. I really liked the result.
     Here is the completed project: I used different, but similar colors on the front and back, and you can see that both sides have the fringe. The dog that you see in the 2nd photo was Fido, our prior miniature pinscher. As I recall, after many attempts to get her to stay off the quilt and out of the picture, I finally gave up.
 
 
I made a label for the quilt using my embroidery machine: 


     My friend Joyce sent me some flannel fabric while I was in Tennessee which included the vegetable fabric and some of the others you see in the quilt below. I added a few more fabrics and voila: another Ragg Quilt. They are the absolute best for lying on the sofa and snuggling under while reading or watching TV. The more they are washed the softer they are and the fuzzier the fringe becomes.
     One day I threw this quilt up on the sofa and it landed pretty neatly. Alice decided to climb under there and since then we always have to have one set up in tent-like fashion for her. If we don't, she has a fit and digs around looking for a way to get under! Here is a video: [iPad users, please note: if the video doesn't show up for you, then please view this on your computer - sorry for any inconvenience, I couldn't get it to come up on my iPad either.]
 
 
Finding peace in creativity,
 
Meryl


Friday, November 23, 2012

Post #9: UFO Report: Jamaica Pouch

     As a knitter, one of my favorite places to spend time on the Internet is a site called Ravelry. It is an information warehouse, a gathering site for all things knitting and crochet, and an online meeting place for creative people from all around the world. There are resources for learning, patterns (free and for purchase), forums, knit-a-longs, and so much more. Each user can create their own Ravelry username and become a part of the community. You can save favorite patterns or designers in your own “notebook” for future reference, and you can upload photos and details of projects you are working on or have completed. If you are having a problem with something there is surely a forum where you may be able to find some assistance. I am barely touching on all that Ravelry has to offer and I highly recommend that anyone who likes to knit or crochet check it out.
     A few months ago I found a free pattern on Ravelry called the Jamaica Pouch that I really liked. It was from a published book called “One-Skein Wonders.” The pattern called for self-striping worsted weight yarn and size 6 needles, but many times I like to do small things, so I figured I'd scale this down by making it on size 2 needles with some self-striping sock yarn I'd had in my drawer for a while. The pattern isn't really complicated, but it is harder to see what you're doing when working with smaller stuff. (At least that's my story and I'm sticking to it)!
     This is how far I got with the project. It is started at the bottom center of the pouch, increasing until the diameter needed is obtained, then the spiral stitch pattern is worked around and around all the way up the sides. (The photo shows my pouch upside-down, with the bottom of the pouch on top and the circular needles still attached as I was working the spiral stitch pattern). I don't know why, maybe I had too many distractions, or I was tired, or it simply wasn't the right time for me to work on this particular project, it doesn't really matter what the reason, but I just couldn't get through it without making tons of mistakes. I'm not that fussy, I don't always take it out and re-do it, but there are times when it will really show, so after starting this and getting quite a ways into it, then ripping it out, then doing it again, (I think I did that three or four times), I finally decided to take it apart and set it aside for another time.
    

     I still love the pattern, there's nothing wrong with it or the directions, and I will probably pick it up to start again sometime in the future. Even though I am usually working on a specific “project” I still believe that I am more of a “process“ knitter. In other words, if I'm not enjoying the process, then there aren't a whole lot of reasons for me to finish the project, even though at one time I thought I would.
     Here's where you can see a completed Jamaica Pouch and find the pattern:

Peace in creativity,

Meryl


Wednesday, November 21, 2012

Post #8: Happy Thanksgiving & Another UFO Report

     Can you believe I have so many UFOs (un-finished objects) that I actually have one that is appropriate for Thanksgiving? That is sick, sick, sick. Not that there's anything wrong with giving thanks. I have many things I am thankful for: my health, my husband, my dog, my peace, my friends, my freedom, my faith, my sister...I could go on and on. The sick part is how many UFOs I actually do have lying around. Actually, I'm quite thankful for the UFO's, too, because they're a sign of me living a life where I do get to spend at bit of my time doing things I really enjoy, things that make me happy and bring a sense of satisfaction.
     Let me introduce you to another one of my long-time UFOs, a Thanksgiving turkey made out of a natural gourd adorned with wood putty, paint, and silk flowers. I made him, well...started to make him about four years ago, (this was in a workshop taught by Tonia Owen at a gourd-crafting group in Bradenton, FL), but I have not completed this project either. He's another one of my “almost complete...over 90% complete” projects.
     I know I have revealed in prior posts that I am a bit of a flake when it comes to completing projects that I begin, but there are some extenuating circumstances that have contributed to this. I lived in Tampa for most of my adult life, and although I occasionally moved from one house to another, it was never a big ordeal as I pretty much stayed in the same area for 29 years. Then in 2004 dear hubby and I decided to make a huge move out-of-state to Tennessee, where we stayed for about two and a half years. When we returned to Florida and decided to live at or near the beach, many things occurred in our lives. There's no need to go into the gory details here, but the end result was that in late 2004 we moved to Tennessee, in early 2007 we moved to Madeira Beach, a year later we moved to the Largo/Indian Rocks Beach area, another year and we moved to Treasure Island (two places in 2 years there), and then back to Hillsborough County east of Tampa in late 2011. I really don't want to sound like a whiner or complainer, but six moves, including two state-to-state moves, within seven years does take its toll. I do not come from a military family; I'm not used to being uprooted like this; I have a lot of furniture and a lot of craft supplies and whatnot.
     Each time we moved things got shuffled around and mixed up further and further. I spent so much time packing and planning and moving and unpacking and settling in that it's a wonder I've gotten anything accomplished at all and an even greater miracle that I have anything left of my sanity. Or do I? I guess it depends who you ask about that! At each place we lived it became increasingly more difficult for me to not only concentrate on projects I had already begun, but sometimes I could not even find them, and when I could locate the project to work on, I couldn't always put my hands on the other assorted materials and tools that I knew I had but were carefully packed away.
                                              
There are more “feathers” to be added to fill out his tail as well as to cover his rear. When I got to this point I discovered that he has the same problem I suppose many middle-aged turkeys have: he is bottom-heavy. When I added the additional "feathers" he ended up tipping over backwards. At about the time I was trying to figure out whether to resolve the problem by either adding some decorative element hanging around his neck to act as a counter-balance or if I should simply mount his legs firmly on a larger, weighted base, we ended up moving to Treasure Island, so in a box he went, and he has been there ever since.
     
I am quite pleased with the look of his feet!

    Even though it didn't start out this way, it is now my hope that writing this blog will not only be an inspiration and encouragement to others, but to myself as well. I also hope to let you know in a future post that this poor, neglected turkey did not make it through another winter without all of his proper adornments. Maybe he'll finally get to join us for Thanksgiving dinner in 2013!

Wishing you a safe and Happy Thanksgiving.
Peace in creativity,

Meryl


Post #7: UFO Report: Beadweaving Bracelets


     Cynthia Rutledge, one of my favorite beadweaving designers, sells wonderful kits to make many of her beautiful beadweaving designs. They are worth every penny simply for the concise, clear, well-illustrated directions that she provides, not to mention the quality and quantity of materials included as well. I purchased a few of these, way back in 2003, and began one of them, called Around About the Wrist, fairly soon after my return from the Beads on the Vine retreat I attended in wine country out in California. One of my quirks is that when I do complete something, many times I'll think I should make a 2nd one, only to then end up with just another UFO (That is, if I ever do finish the first one).
     Well, I did finish that first “Around About the Wrist” bracelet pretty quickly, which for me, is a rare occurrence. I discovered there were enough materials left over to make a second bracelet as long as I left off the spinning dangle, or I could purchase some more beads to make that part if I decided to, so I started on a bracelet that I could give as a gift. Needless to say, the second one is still unfinished. Almost done, but still unfinished. Does anyone else have this problem? I don't just end up with UFO's, I end up with many that are 90% or more complete. So close and yet so far!

     The bracelet on the right is the completed project. The green triangular-shaped dangle actually spins around freely on the center of the bracelet. When I started the second bracelet, I decided to reverse the base colors. I also did not pull out the directions again when I started on the fringe, (I am an experienced bead-weaver), and I ended up making it twice as thick as what was called for in the original instructions. I never did say I was good at following directions! When I got to the point where I was ready to start down the other side, I wasn't sure if I had enough beads to finish the fringe in the same way. So there you have it...another UFO. I can't decide whether to:
A) Remove the fringe from the one side, and then re-do the fringe per the instructions, which should leave enough beads to finish both sides, or
B) Take my chances and keep going in the same manner, hoping and praying I don't run out of beads, or
C) Come up with a slightly different fringe design for the remaining side that would possibly use up fewer beads, or
D) Simply leave it as is, so the bracelet has fringe on only one side, which I think actually looks nice if worn with the fringe facing down toward the wrist.
     Sometimes I can't make a decision, so I set the project aside for a while and move on to something else until the right time comes when I figure out what to do. Who knows when that right time will be? I surely don't. But I will, at some time I will. I just don't know when.

Peace in creativity,

Meryl

Post #6 Additional photos of Joyce's Birthday Bouquet

     I have located some more photos of Joyce's Birthday Bouquet (see Post #2), which show a little more detail, so I thought I would post them here now. Here is the quilt as I was still developing the flowers. Some of the flower centers are stuffed with batting.


These next photos show more detail of the applique and texture of the quilting design:      
     I am one of those people who does not like to pre-wash my quilting fabric before starting on a project. I do this mainly for two reasons:
1) I am lazy and simply don't wish to be bothered with all that extra washing and ironing. I know there are quilters out there who don't agree with that, and that is fine, for anyone can make their own projects any way they wish. I take pride in taking the lazy route sometimes.
2) I really like the stitch definition that shows up when a quilt made from unwashed fabric and batting is then machine washed and sometimes even machine dried after it is completed. The front and back fabric do not necessarily shrink up at the same rate as the batting and it can be quite unpredictable. I like all of the bumpy texture that shows off the quilting design. It lends a lot of character to the quilt.


Another detail that I like to add to a quilt project is a personalized label. This can be as simple as a signature written with a permanent marker, or something more elaborate, like the one I made on my embroidery machine and then hand-sewed to the back of this quilt:


I started working on this quilt while living in Tampa in early 2004, but later that year we moved to Tennessee (We only stayed a couple of years...missed Florida too much). Getting a project like this done within 2 years is a huge accomplishment for me, especially when you consider I made an out-of-state move during that time. I'm actually sitting here on the couch with my laptop, and if I look to my right, I can see another quilt, already pieced, layered and pin-basted with batting and backing, waiting to be quilted...and I finished the piecing on that one back in 2003. Procrastinators of the world, take heart...there's really no pressure...just do what seems best...do what makes you happy. There are no rules.
 
 
Peace in creativity,
 
Meryl

Monday, November 19, 2012

Post #5 Trapunto Quilting by Machine

     In 1999 or 2000 I took a class in Trapunto Quilting by machine, a method for creating “stuffed” quilting, which gives added dimension to a quilt. In class I made a small wall hanging quilt of a single rose, and I really enjoyed the process as well as the final result.

     My husband sells recreational vehicles, most of which are of the large, luxury type. I decided to try this technique out on a Prevost bus design for him. It is the first in a series of motor home art I am creating to decorate his office at work. Now please keep in mind that I am not one of those quilters or artists who has to have everything perfect. Sometimes my work is quite messy, sometimes it is quite neat. I have so much making and creating I want to do, I can't always let perfection slow me down. If you are put off by the inconsistencies in the quilting or the fact that the rectangle of the quilt is not perfectly squared off, that's your issue, not mine. I love this quilt and what it represents. My husband enjoys selling these types of buses and RV's and his customers enjoy seeing this tiny quilt hanging in his office. I really enjoyed making it!


In a future blog post I'll share a companion piece that hangs with this quilt in his office.

Peace in creativity,

Meryl

Sunday, November 18, 2012

Post #4: Computerized Machine Embroidered Baby Gift

     I own a fabulous sewing machine, a Bernina 170E, which I have had for almost 15 years. I got it about six months after I started quilting and it was my dear hubby who convinced me to get the one with the machine embroidery attachment. I must say that for a long time I thought quilting and machine sewing and machine embroidery was it --- that was going to be my main thing forever and ever and ever. You can probably see where this is heading. I am a flake. I change direction all the time. If you were to ask me now what I prefer, I would tell you that even though I love machine work, if I had to choose, it would be hand work, such as bead-weaving or knitting or bead-crochet. Maybe next year I'll change my mind again. Maybe next week. Maybe tomorrow. Oh, well, let me get back on track...
     Quite a few times since I got my embroidery machine I've had the need to come up with a cute baby or child's gift, nothing big or fancy, but something that is special and that I hope will be appreciated and cherished by the recipient. What I came up with is so simple, yet every one I have given has been enjoyed by the parents and child it was given to. It is a small pillow that is personalized with the child's name and has a hanger at the top so it can be hung from a doorknob. I vary the shape of the pillow, the exact wording, the embroidery design, and also the trim that I use to finish it off. They are fun to make, don't take a lot of time and materials, but always bring a lot of smiles. 
     This is the last one I made, which was for a dear friend's granddaughter, and I've been told that Sagan likes to carry it around with her. It made me feel good to hear that she has been enjoying it!

Until next time...

Peace in creativity,

Meryl


Saturday, November 17, 2012

Post #3: Beads on the Vine and a new UFO: Beadweaving bracelets

Somewhere around 9 or 10 years ago I had the wonderful opportunity to spend a glorious time in San Luis Obispo, CA, which is in wine country. I was there to attend Beads on the Vine, which is a multi-day workshop held in a winery overlooking the beautiful scenery of the vineyards and rolling hills. Each of the three days featured a different instructor and a different beadweaving project. The three world-renowned teachers were NanC Meinhart, Carol Wilcox Wells, and Cynthia Rutledge. If you're not familiar with their work I highly recommend you search for them on the Internet. Their work is awe-inspiring.

In Cynthia's class I made a peyote stitch brooch of Delica beads adorned with semi-precious stones.


In NanC's class I made a right angle weave cuff bracelet with a frothy fringe.  

In Carol's class I made a bracelet of chevron chain with lots of sparkle added.
 

I am happy to report that I completed all three of these projects at the retreat. What an accomplishment! (Maybe that's because I don't drink wine)?
Now for the UFO part(s):
     The clasp on the bracelet I made in Carol's class broke at some point. This is such an easy fix, I have no idea why I have not done it yet! I love this bracelet and it fits me perfectly as long as it has a working clasp. That may be one of the things I hope will come of me writing this blog. Maybe it will motivate me to move on with some of the things I have been stalling on. Maybe not. We shall see....
     The cuff bracelet I made in NanC's class closes with three large snaps and fits around your wrist so that it doesn't spin around too loosely. After the retreat I lost quite a bit of weight and it was huge, too huge for me to wear without making some adjustments. This would involve removing the snaps, running some beading thread through where I want the bracelet to now end to secure the beads, cutting away the excess, re-securing the beads, and reattaching the snaps for the closure. It really would not be a big deal, maybe an hour or two if I take my time. Once again, why have I not done this? Do I sound like a crazy person? Sometimes I'm such a procrastinator. I can't be the only nut who keeps moving on to the next project. Am I?
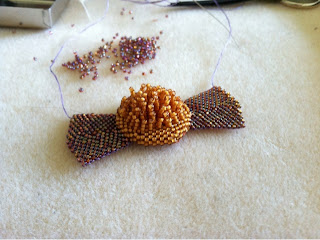
     Fast forward to 2012, yes, this year! I pulled out another one of Cynthia Rutledge's kits that I had purchased long ago and started the project. It was going along quite nicely. Really it was. Here are pictures (at least, pictures of how far I've progressed, so far):


That was sometime back in the spring. I'll keep you posted if and when I get back to it.

Peace in creativity,

Meryl